Page 2 of 7
My Studer A80R
Recently purchased an A80R. Try to document what is done
Motor recap needed:
2pcs Ducati Energia 416.10.25 20uf+-5% 425V
2pcs Ducati Energia 416.10.15 10uf+-5% 425V
1pcs Ducati Energia 416.10.13 8uf+-5% 425V
7pcs 470nF Panasonic ECQUA 275V (4pcs on Contactor)
Bearing plans idea records:
-EZO is likely to be purchased. Need less tight, then SKF, as tightness causes noise.
-Explorer line from SKF is their low noise and vibration choice. Actually did not found such in SKF selector, whil eseet his at Nagravox offer… strange.
-BIG bearing is Studer #41.04.0113 / 41.99.0103(same, but noise checked) / 41.99.0111: Was an SKF 61900-2Z big(22pcs). 10mmID X 22mmOutD X 6mm Width. Also good: EZO 6900ZZ There are no differences at all, in some countries SKF and some other manufacturers called the bearing 69xx and in others 619xx and that’s the sum of it.” Plan to buy this:https://csapagybolt.webshopod.hu/csapagy/2448-6900_2Z_EZO-EZO-6900.html https://www.onlinecsapagy.hu/termekeink/2005_csapagyak_egysoros_melyhornyu_golyoscsap/6900_2z_ezo
Pinch roller arm p299 6pcs stabilizer roller arm p299 2pcs, move sensor PRC276 2pcs , Guide roller left 2pcs, spooling motor p295 2pcs(noise!), pinch roller p 291 2pcs (noise), stabilizer roller p289 2pcs(noise), Tape tension 2 x2pcs 285p, –> 22pcs
capstan motor is slide bearing
-Small bearing Studer #41.04.0102: The tension rolers SKF 623ZZ, the small ones(8pcs) for the tension rollers : 3mmID X 10mm X 4mmWidth EZO 623ZZ , https://www.ezo-brg.co.jp/english/product/spec.php?eid=00265&unit=mm https://csapagybolt.webshopod.hu/csapagy/683-623_2Z_EZO-EZO-623.html
Tape tension rollers p287 8pcs,
-Probably not needed Studer #41.99.010 (RF516) 5mmID X 16mm X 6mmWidth
Some interesting guide: https://www.precisionmotorworks.com/shop/contents/en-us/d9.html
Capacitor discussions:
https://www.tubeguru.eu/studer-a80/studer-a80-fully-refurbishe/index.html
https://www.tannoyista.com/2021/09/studer-a80-master-tape-machine.html?m=1
https://www.whatsbestforum.com/threads/final-touch-up-for-studer-a80-rcs-modification.3785
For Power supply F&T looks good.
LFB47206335050 2pcs
LFB10306335066 1pcs
LFB10304035050 1pcs
LFB22304040066 1pcs
Counter was not recaped. Counter display C3 10uF 25V Axial,!
Counter decoder 15uF 10V normal
Basis board C1 47uF 16V axial, C2 470uF 6V axial
Reproduce amp x2: C33, C34, C35axial 1000uF 18V dia:13mm length:30mm ; C30, C18 47uF 18V 5mm leg spacing 12mm height; C3 C8 10uF 16V TA; C4 C31 100uF 3V TA ; C16 C19 47uF 3V TA
Record amp x2: C3 C5 C25 C28, 47uF 50V 5mm leg spacing 12mm height; 47uF C7 C36 TA, 3,3uF C27 C18 C22 TA, C4 C6 C26 10uF TA
Audio stabilizer: C7 C2 2200uF–>4700uF 25V 40length 17mmdia AXIAL, C10 C5 10uF 50V 5mm 12mm height, C4 C9 10uf TA,
Manual:
Stabilizer p 144
Playback p 214
Record p 218
head block p 281
Tape tension p 287
Spooling p 295
A101? https://www.pievox.de/Homepage_Pievox_Angebote_Studer.html
Mullard 5-20
Aim to build http://www.r-type.org/articles/art-003d.htm in Ag9015 case
Use 5R4G, or the later and smaller 5R4GB. It only needs 2A and will give slightly more compression
Mods:
Braun L810 – a best buy loudspeaker
I heard in May 2023 at a friend’s home (sadly, but not a friend anymore…) the Braun L710. I was surprised by the concert feeling, by the atmosphere what that thing did. The guy had been saying this for over a year, how good the Brauns are and I ignored it. Maybe the fine details are not the best, but the overall sound pressure and the natural and honest acoustics dazzled me. And not just me, 2 of my other friends (they are still my friends) heard the same. One of them purchased that damn thing and proved that we were not wrong. Is a fantastic speaker if fed with good material. So I purchased the Big Brother L810 (more bass, but the same mide/tweeter)! 150EUR+60EUR post after some negotiations. Condition, nearly horrible, but I classified it as fixable. (Fix laminate errors, repaint, bend back grill… replace 50uF electrolytic caps, new connector, ect…)
On the video before any fix, but: This is the sound that I was looking for. I find it flawless, and straight to the point. Perfect for Rock, but I loved jazz also on it. In level of joy, this is the first time something that close to my loved Tannoy Chatsworth. A big recommendation to these speakers. Very unlikely that they are tun with high-end source or amp, so very likely even the seller has no idea how good these damn things are.


Kudos for AVS forum for the crossover pics. Schematic of L710 and L810 seams to match, except C6, which is 3.3uF(L810), 4.7, 5.1 or 5.6uF… (L710), but here the high driver is the reason LC2 (L710)–> LC3 (L810).
https://www.avsforum.com/threads/braun-l810-sibilance-and-crossover-upgrades.2605433/
| Type | 3-way, 4-speaker, closed cabinet |
| Drivers | Low : 21 cm cone x2 Mid : 5 cm dome High : 2.5 cm dome |
| Frequency range | 20 Hz to 25 kHz |
| Sensitivity | 88dB/2W/3m |
| Impedance | 4 Ω |
| Rated input | 50W |
| Appropriate amplifier output | 20W ~ 60W |
| Crossover frequency | 550 Hz, 4 kHz, 12dB/oct. |
| Internal volume | 41 liter |
| External dimensions | Width 360x Height 650x Depth 280 mm |
| Weight | 22kg |
https://www.lautsprechershop.de/hifi/braun_l710_fw_en.htm
Other: Back is plastic covered! Formica?
https://www.tannoyista.com/2015/09/my-lockwood-major-loudspeakers-history.html
“The cabinets are encased in 1,5mm Formica which forms the rigid structure over the large sub straights. Remove the Formica and you will ruin the sound.” So I propose to take care of it, even if in bad condition.


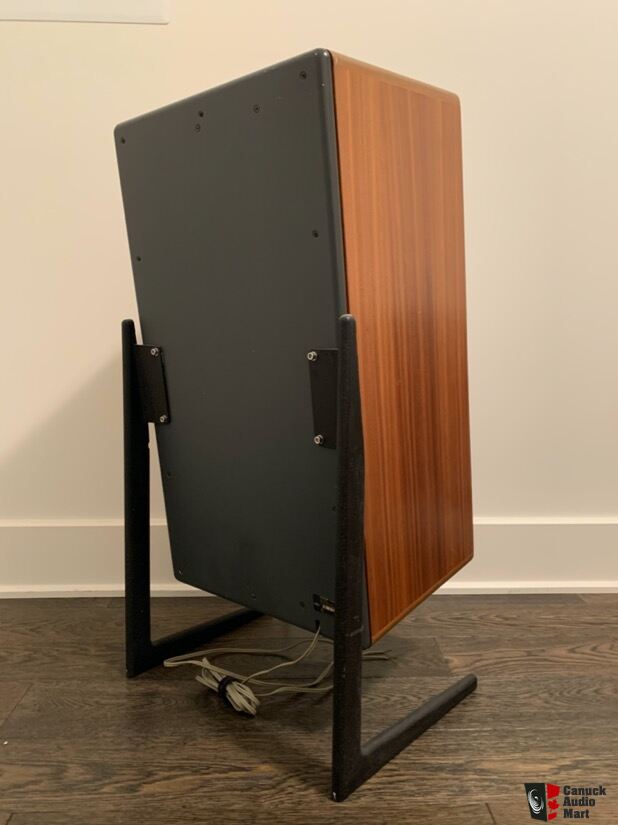
Note: Kangoroo measurements pics are from L710!!! Base on pics the L710 kangoro elevetes the unit with 19cm and tilts it with 10degree. The L810 elevation is 12cm and tilt is 13degree. The Brown wood laminated speaker is an L810.
My Chattsworth crossover HPD/315/8
I have no idea what caps were put once by somebody. The may even original as they look like Arco (used by Tannoy), but grinded down and wrapped in textil.
The cabling improvement is a shame. Not my work.
The 15uF for the bass is closer to the “Gold” crossover design, wondering if this may be factory value.
The 3120 as many other DIY-er realized has a value of ~3.3mH and not 1.2mH as at many places suggested.

Interesting links: https://audionostalgia.co.uk/tannoy-monitor-gold-upgrade/
http://www.troelsgravesen.dk/MG15XO-up-grade.htm (Measure 3120 as 3.2mH)
http://www.troelsgravesen.dk/MG15-problem.htm, Coil measurement: http://www.troelsgravesen.dk/MG15-problem_files/Tannoy-data.pdf
http://www.cma4ch.org/chemo/attivita/xover385a.html
https://www.hilberink.nl/codehans/tannoy36.htm
https://www.hilberink.nl/codehans/tannoy37.htm (Wrong value for 3120!!!)


My Studer B67 MKII
Sourced such nice Tape machine to fulfill long time ago wish. Try to collect here docs that are relevant or interesting.
Found this page very useful:
http://www.alexandrugroza.ro/vintageaudio/content/studer_b67-mkii/index.html
However in the tone boards I would ommit all Tantals and use the more cost effective Muse electrolytes. But is well documented, so suggest it as start.
For EQ:
http://www.sengpielaudio.com/calculator-timeconstant.htm
https://gyraf.dk/schematics/schematics.html
Bearing:
Studer #41.99.0106 (RF516), ID 5 x OD 16 x W6, Ball Bearing D=5/16×6 (QTY: Tape tension L+R 4pcs), only 5mm thick is available!!! With 1mm shrim, itn works
Studer 41.99.0105 Ball Bearing D=8/22×7 Qty 2+2pcs for Spooling Motor EZO6082Z
Studer 1.020.840.09… 1.020.840.10. 1.020.820.06. head block
Manuals here: https://www.reeltoreel.nl/studer/Public/Products/Recording_Analog/B67_MkII/
dB callcs:
Wall mount
Since a long time I was confident that eliminating feedback from loudspeakers, my military box was terrible. Tried out crazy ideas like the Ikea lack, which is even worst. Played around with lifting, isolations, but no improvement. The last push was from Zsolt Bodnár (72 audio) to be not lazy and build a stand. (well was lazy to just borrow sizes from him, thx ) Here are some pics and guide for other lazy DIY-ers, who just need the last drop to build such. The result is very good for turntables or tube amps where microphony could be a problem.

2pcs 250mm, cut on both side in 45degree on the 40mm sides
2pcs 500mm, cut on both side in 45degree on the 40mm sides
2pcs 430mm, cut on one side to 45 degree one the 20mm side
1pcs 500mm cut on both side to 45 degree on the 20mm side
On 500mmx 445mm ~40mm hard wood table
4pcs ~6mm damping pod
Result:

Dual 1219 DIY + 72 audio tonearm
I was using a nice Lenco PTP (pics here where I sold: https://avxforum.hu/forum/viewtopic.php?f=31&t=170585&p=2731993#p2731993 ) with Fidelity Research 24 tonearm, till the owner/designer of 72 audio – Zsolt Bodnár – showed me that there is way of improvement at my frontend. He brought a DIY turntable with Dual 1219 roots and his tonearm (1800EUR) built in small series with his MC and his MC trafo (72 audio).
The tonearm is a miracle, which just works due to its simplicity. This blog entry shows in pictures what to do with the Dual 1219 to improve sound quality to finally be on the same page or better as Garrard, EMT, SP10, or my PTP. (I know just the PTP with proper experience, so handle this now as my strong belief) So ideas are not from me, I just try to have the same sound again in my chain that I got demonstrated by Zsolt:
(yes this is an Dual 1219! Dual 1229 same, but has neat strobe )

Compare sound to a Garrard 401 with Audio note: https://www.youtube.com/watch?v=HmleXoPgT2U
Later comparisons showed, that beats easily Micro Seiki RX 1500, Garrard 301, Lenco PTP5, Dr Feickert Woodpecker and Volare both with factory tuning. For peanuts…
Step 1 Remove everything from the chassis. Part you have to keep is the chassis(14), spring leg (78-82) the turntable (3-6, 16, 17) speed setting components (8-12, 101-115) and the motor (116-125), the motor switch is not mandatory, but feel free to keep it (parts 130-135, but you need to cut and bend the switch lever to make it constantly on). User manual to see assy and identify part numbers, motor electronic schematic is here.

Step 2. Close the holes with car body repair filler (is epoxy based) and sand it down with water proof sandpaper (water helps to not fill up the pores while sanding ) 200-400 sandpaper is fine. At the speed setting knob, add a 29mm coin exactly centered to the middle shaft hole (the 2 slot is not centered! Do not worry. if one seems to be more away than the other. You can see this in the bottom right of the next pic)

Step 3 Paint or add leather to look nice (The one in the picture is used by Porsche).


Step 4 Assy it back. Do not forget to clean and oil with sewing oil all bearings and moving parts. I see the debates to use single 40W or multi 5W20… probably all works, but self need to test which the best, maybe the tackier 40W. (inside the motor there is one hidden bearing, you will need to take it apart) The height of the driver motor wheel helps to set the speed knob to the middle(side screw-118 fixes, top screw -116 aligns height) Add bitumen-based sound absorber (car HiFi shop, 2mm with a thin aluminum carrier), to compensate for weight loss and eliminate vibrations (add double on the tonearm side to compensate asymmetric plate weight) Oh and you will need a hook to fix part 103 (spring of the idler arm) somewhere. I fix the hook with the the bitumen plate, I simply put it under it, while hook comes out.


Step 5, Polish the running surface till it mirrors. (the top of the left pic is a mirror)


Step 6 Add a heavy wooden plinth. The aim is that there is no feedback from the loudspeaker, while resonances are well suppressed. Think about using a wall console!
Step 7 Get 50Hz 230V clean power source. Less, than 60 Watt type, so something built for turntables . Should be with the precise clock to eliminate wow, flutter, or speed deviation. Should operate with LOW THT Sinus. Should drop the voltage to minimize motor vibration. 110Volt is enough. That will help that motor gets not hot. Ensure that chassis has protection earth!
Step8: Plinth. 5 layer CNC formed 6pcs 18mm plywood.
Can give you not painted one for 180Eur+ship cost. Mail me at r.bakos.gyorgy at gmail.


Note: Dual 1219 has a really bad bearing. PTP or Lenco is way more advanced. Motor vibration is enorm, but it gets very well suppressed with the motor holder. The plate has also audible noise while rotating as the motor. I think the side idler helps a lot with the direction to eliminate this. Overall: Very hard to believe this is better than my PTP, but listening confirms it. What comes from the loudspeaker is not bearing the listed flaws.
NOTE: The Idler deforms, if you do not leave it in neutral position the gear switch.
The speed after gear switch use needs to be finetuned. I used 67.5Hz via https://turntablepower.wordpress.com/ for precise result.
Interesting links:
Warsaw critic, search for 72 audio: https://soundrebels.com/audio-video-show-2022-cz-2/
“And now it’s time for … no, not for Telesfor, but for probably the biggest sensation of this year’s exhibition, i.e. the Hungarian Popori Acoustics electrostatics, which, together with the 72 Audio electronics, caused such a stir in the lobby that most of the interlocutors were unanimously inclined to consider them the best sound in the Sobieski, with which I do not intend to argue, because it was indeed a phenomenal musical feast. Maybe the bass did not go very low, but it was energetic and tight enough not to show signs of slimming, while the rest of the band stunned with its resolution and speed. Big and well deserved applause!”
Stereophile mentioning
https://www.stereophile.com/content/warsaw-day-2-exotica

Michael Fremer:
“SOUNDED REALLY GREAT”
I recently upgraded with magnet bearing. Bought an 20mm-10mm/3mm N35 magnet from Aliexpress. Drilled up one with 11.6mm in lathe with using Dremel.(dust is cancer! Avoid it while work.) For bottom you need 4-5mm (if smaler, then take N48 or bigger) I sourced this: https://neomagnet.hu/Neodimium-gyuru-magnes-23x10x5-mm-N35
https://www.aliexpress.com/item/1005004709258043.html?spm=a2g0n.order_detail.order_detail_item.3.206cf19cN2SCJb , funny that they sent 3mm, while says it is 2.5mm When I ordered later an 3mm, then got a 2.5mm… So you need to deal with this…
Found it usefull forces: https://www.kjmagnetics.com/calculator.repel.asp?calcType=ring


Warsawa 2023, from time 15:40, 72 Audiio introduces this, but, is in Hungarian: https://youtu.be/yzpy-SiPzDU?si=KMBfjN9WLeZCs-lJ
Turntable hum 2 (an exact case)
In the previous blog entry, I tried to show how to connect a generic turntable to the amplifier to avoid hum. This time I show my chain and how I connected it and eliminated hum completely.
The brief schematic is:

Important to keep MC transformer more than 0.5meter away from the amplifier transformer. If not possible, try to rotate it to find a dead spot where the magnetic field is not causing humm.
As you can see there is no loop, nothing is connected via more the one cable. I am thinking of connecting the tonearm to the MC transformer housing but found no need yet for this as this was already very quiet.
Output transformer
The output transformer has ~4ohm output! (3.7Ohm to be more specific)
You need to connect the speaker for this mode between the 8ohm positive (which will be the “new” GND) and between 16ohm positive (will be the “new” 4ohm +)
Measurements + Pin out:


The below current mirror choke, along the Rodenhuis book, should be something similar, just split, (S6-S6a, S4-4a). While resistance is similar, the 8H is –> ~ 60H@50Hz!

 Philips AG9015
You must be logged in to post a comment.